Speak to the Dead with Deep Learning

Introduction
I grew up reading science fiction where people would try and embed their consciousness into machines. I always found these stories fascinating. What does it mean to be conscious? If I put a perfect copy of myself into a machine which one is me? If biologic me dies but mechanical copy me survives did I die? I still love stories like this and have been devouring Greg Egan lately, I’d highly recommend his book Diaspora if you think these are interesting questions (it’s only $3).
But I digress. With today’s technology, it’s possible to make a rough approximation of a person’s speaking style with only a few lines of code. As Covid-19 has burned through the world I started to worry about the older people in my life and wonder if it would be possible to preserve a little piece of them somewhere. This tutorial is my feeble attempt at capturing and persisting some conversational aspects of a person beyond the grave.
Appeal to Reader
If you pay for Medium, or haven’t used your free articles for this month, please consider reading this article there. I post all of my articles here for free so everyone can access them, but I also like beer and Medium is a good way to collect some beer money : ). So please consider buying me a beer by reading this article on Medium.
TLDR
You can take your texts with any person and use them to train a simple chatbot in only a few lines of code. All code for this tutorial can be found here.
Getting Data
In today’s world, people post so many things online and you can find an enormous amount of data, for better or worse, on most people with just a little Googling. The unfortunate, or fortunate, the reality of collecting data on the elderly is that they don’t have as strong of an online presence. My grandma doesn’t have Twitter or Facebook. If they did, they wouldn’t be posting regularly enough that I’d be able to extract any meaningful signal. So I turn to their phones.
Everyone has a phone. We use them all the time to communicate and they hold a decent record of our past conversations and interactions. They’re the perfect tool to use for capturing an initial model of someone’s conversational style. For this project, I’m going to create a conversational texting model of my father. He let me borrow his phone for a day to scrape all of the texts from it. With those texts, we’ll format them in a way that a deep conversational model can understand and fine-tune it on his texting patterns.
Extracting Texts
My dad and I both have iPhones so this tutorial will center around how to extract and process texts from an iPhone. You can make a backup of your device using iTunes but then viewing and interacting with that backup is kind of a pain. The best thing that I’ve found for extracting and processing texts from an iPhone is iMazing and this tutorial will walk you through how to use that tool. You do not need to purchase iMazing to do this walkthrough. They have a 30-day free trial which should get you through this project no problem, but if you do end up purchasing it, this is my affiliate link so if you buy it after clicking on this link I get a small kickback : ). If affiliate links feel smarmy to you just click on this one. It goes to their normal site, no kickbacks. They’ll never know I sent you.
Android
If you’re running Android it looks like there are some software options to help you extract and backup texts. This free App seems to do the trick. I also found a post describing how to do it here. Unfortunately, since I don’t have an android phone I haven’t been able to test these methods. Though if you run into trouble formatting your data I’m happy to chat and help you debug.
iPhone
Step 1: Create a backup using iMazing
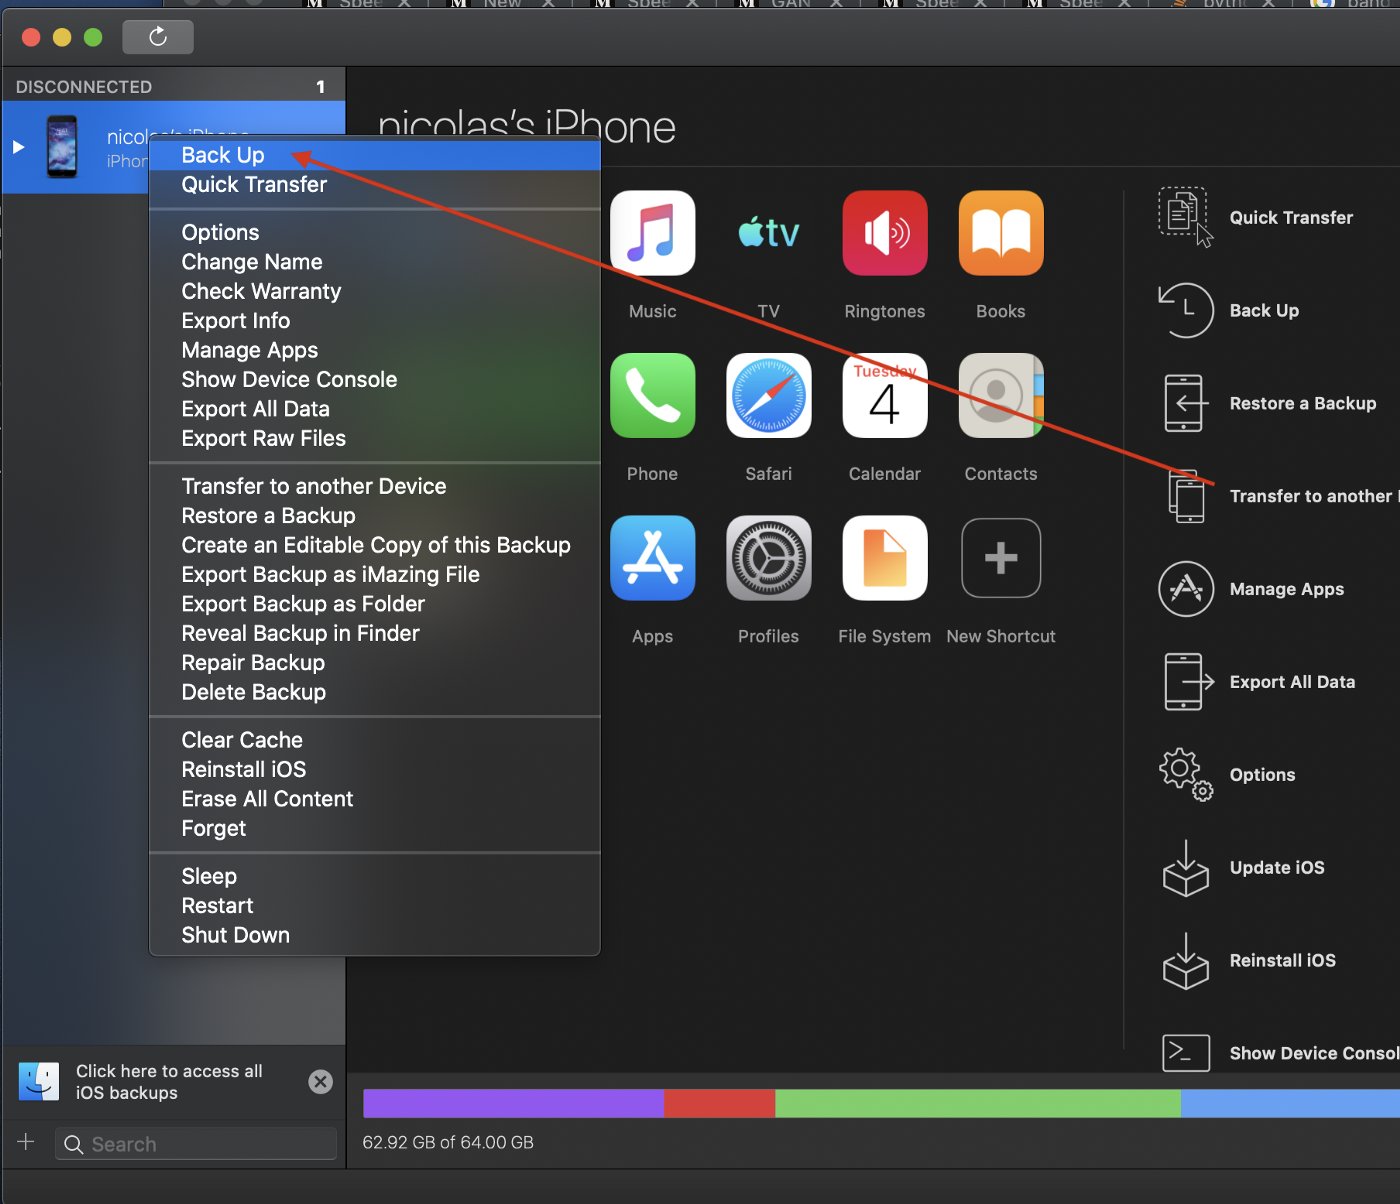
Plugin your iPhone and open up iMazing. You should see your phone in the top right corner. Right-click on it and select “Back Up”. This will make a backup of your phone much like in iTunes but here you can easily access and export your data. It will probably take five to ten minutes to complete.
Step 2: Download the Data as a CSV
Once the backup is made we can access our text messages by:
-
clicking on the messages icon
-
Selecting the conversation we want to extract
-
Clicking on the export to CSV button
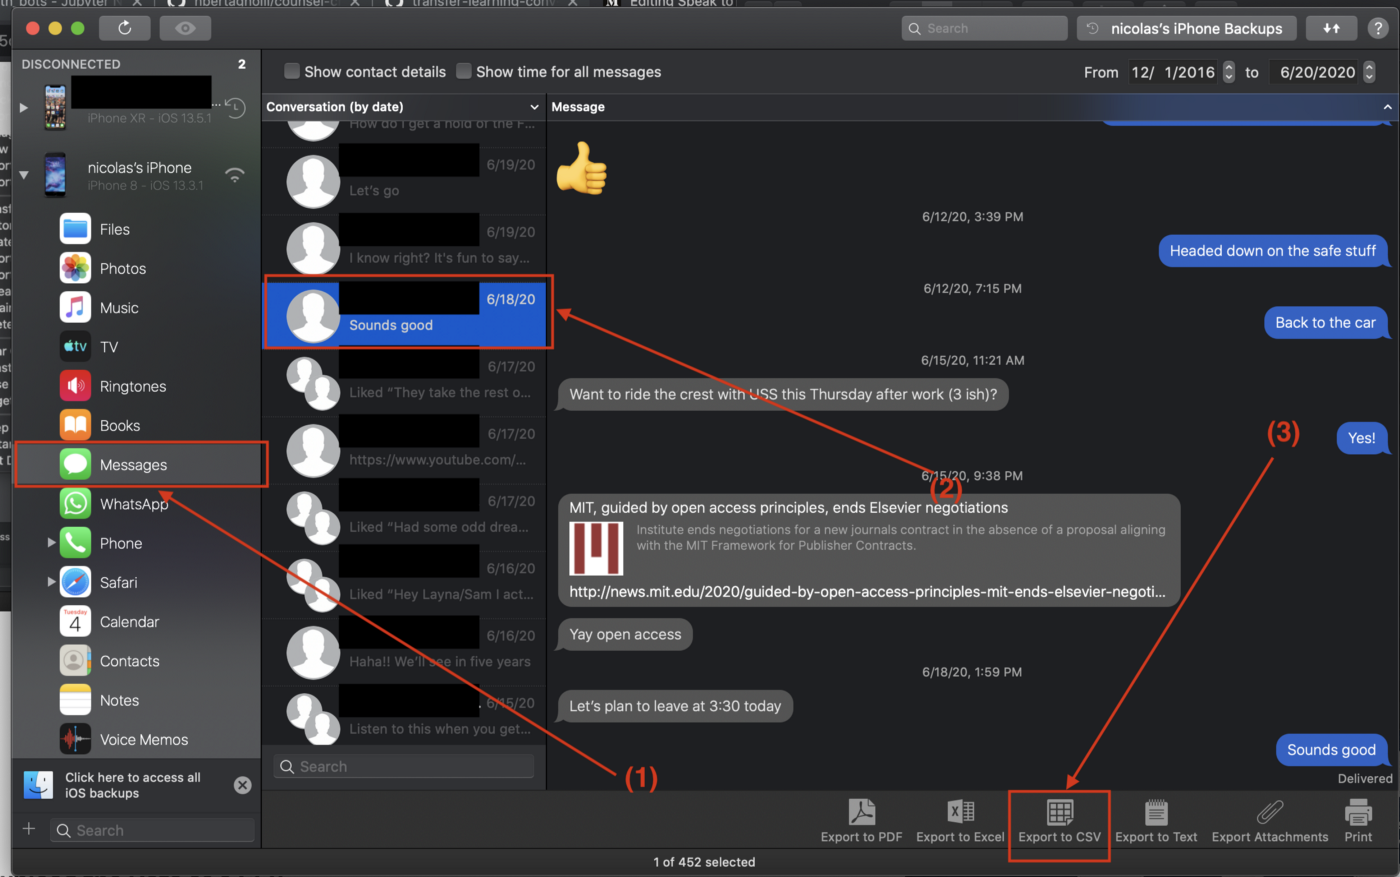
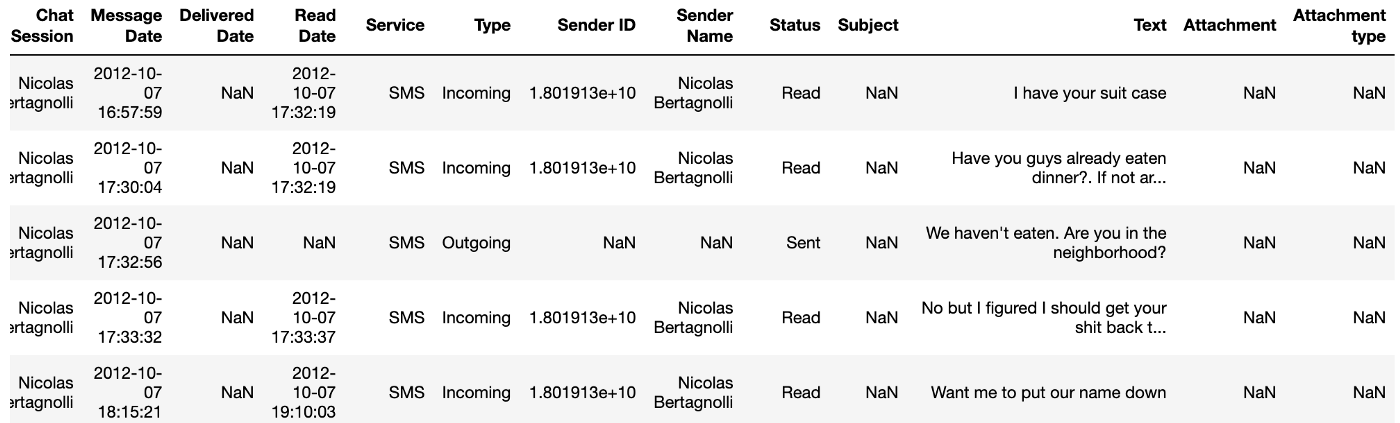
That will extract a CSV of all past texts saved on your phone between you and everyone in the conversation. The CSV has a number of fields as you can see below but we only need three of them for this project Message Date, Text, and Sender Name.
Preparing the Data for Training
Our task here is to construct example conversations to train our chatbot. The first thing is loading in the data. The below code snippet will take care of that. This code is pretty straightforward. We load in the CSV, do a little renaming and data formatting for ease of use and voila. One thing to note is that I fill in the null entries in the speaker column with a provided receiver_name. iMazing doesn’t do an amazing job of writing down who the owner of the phone is in a conversation. It leaves that position blank. So everywhere there is a missing value we can fill it in with the person who owns the phone.
def load_data(path: str, receiver_name: str, train_percent: float=0.9) -> pd.DataFrame:
  """Loads in csv conversational data downloaded using iMazing

  Args:
    path: The path to the text conversation csv
    receiver_name: The name of the owner of the phone who was used to generate the data.
      The Sender name is blank for the owner of the phone and needs to be filled in.

  Returns:
    data: A DataFrame containing formatted conversational data. It has the following columns:
      - sender_name: The person who sent the text
      - date: The date of the text
      - text: The text of the mesage which was sent
  """

    # Read the data and rename columns to not have spaces.
    data = (pd.read_csv(path)
               .rename({"Sender Name": "sender_name",
                        "Read Date": "read_date",
                        "Delivered Date": "delivered_date",
                        "Message Date": "message_date",
                        "Text": "text"}, axis=1))

    # Extract the date in the form yyyy-mm-dd
    data["date"] = data["message_date"].apply(lambda x: x.split(" ")[0])

    # drop all data without date information and fill in empty speaker names
    data = (data[["sender_name", 'text', 'date']]
            .dropna(subset=["date"])
            .fillna(receiver_name))

    # Lower case all speaker names
    data["sender_name"] = data["sender_name"].apply(lambda x: x.lower())

    return data
With our data loaded in we now need to condense texts from the same speaker into a single line. Notice how in the first three lines of the dataset in Figure 3 I text twice to complete one thought. We need to compile all of those together so that each row of our data frame is a different speaker. This will make processing the data easier. We can use the following code to do this:
def compile_conversation(data: pd.DataFrame) -> pd.DataFrame:
  """Groups all contiguous rows with the same speaker into a single row.

  Args:
    data: The dataframe of talkturns.  It must have the columns sender_name and date.

  Returns:
    grouped_df: A DataFrame where the contiguous blocks of speakers have been concatenated together
  """
    data["group_key"] = (data['sender_name'] != data.shift()
                     .fillna(method='bfill')['sender_name']).cumsum().rename('group')
    grouped_df = data.groupby(['group_key', 'date', 'sender_name'], sort=False)['text'].apply(' '.join)
    return grouped_df.reset_index().drop(columns=["group_key"])
This is a little tricky so let me walk through it. We use shift() to make a copy of the DataFrame but offset by a single row. Then we can compare every row’s sender name to it’s offset sender name. If they are different then we know we’ve transitioned speakers. We create a group_key to represent these distinct spans of text. Then we can group on this key, the date, and the sender name to get our compiled spans of text.
The last thing we need to do is split the data. It’s useful to have a small validation set to get a sense of generalization while training.
def split_on_date(data: pd.DataFrame, train_percent: float=0.9, seed: int=1234):
  """Splits a DataFrame into train and validation sets based on the date.

  Args:
    data: The data we want to split.  It must contain a date column.
    train_percent: The percent of data to use for training
    seed: The random seed to use for selecting the sets

  Returns:
    data: A DataFrame with a new split column with values 'train' and 'val'.
  """
    dates = set(data["date"].tolist())
    dates_df = pd.DataFrame(dates, columns=["date"])
    np.random.seed(seed)
    dates_df["split"] = np.random.choice(["train", "val"], dates_df.shape[0],p=[train_percent, 1 - train_percent])
    return data.merge(dates_df, on="date")
Here we get all of the distinct dates and then split them into either a training set or a validation set. Then we merge these splits back into the original DataFrame. This makes sure that texts that occur in the same conversation don’t end up in both the training and validation set.
Formatting the Data for Hugging Face Model
We will be using the excellent hugging face conversational ai for this project. Facebook just released < href=”https://ai.facebook.com/blog/state-of-the-art-open-source-chatbot/”>Blender</a> which would be another cool option as your base chatbot if you have a supercomputer, but I don’t so I’m going to stick with models I can fine-tune in finite time : ).
The data format for the Hugging Face transformer model seemed a bit confusing at first, but it was fairly easy to generate. The training data needs to be a JSON file with the following signature:
{
  "train": [
    {
      "personality": [
        "sentence",
        "sentence"
      ],
      "utterances": [
        {
          "candidates": [
            "candidate 1",
            "candidate 2",
            "true response"
          ],
          "history": [
            "response 1",
            "response 2",
            "etc..."
          ]
        }
      ]
    }
  ],
  "valid": ...
}
Let’s break this down a little bit. The larger JSON object has two main keys. “train” and “valid”. Train is the training data and is a list of personality, utterances pairs. Valid is the same but for the validation set. The personality is a list of sentences defining the personality of the speaker. See the Hugging Face tutorial for more details on this. For my model, I made the personality the name of the individual that my dad was talking to. The candidates section holds a list of possible responses to the input. This list contains some non-optimal responses to the history of the conversation where the last sentence is the ground truth response. Lastly, we have to define the history of the conversation. This is a list of strings where each position holds a new talk turn. If you want another example of how to format the data, Hugging Face has a good one in the repository you can find here.
Training the Model
The fine people over at hugging face put together a docker container for us so setting up model training is a breeze! Simply run make build to construct the convai docker container, then run make run to enter the container in interactive mode.
From inside the container, we can train our model. We just navigate to our project folder from inside docker and run:
python3 train.py --dataset_path {data-path}.json --gradient_accumulation_steps=4 --lm_coef=2.0 --max_history=4 --n_epochs=3 --num_candidates=4 --train_batch_size=2 --personality_permutations 2This took about 10 hours to train on my CPU. It should be trained on a GPU but since running it overnight is convenient enough for me I haven’t gone through the effort of setting this up on my GPUs yet.
Speak to the Dead (Or not so dead in this case)
The last step is interacting with our conversational agent. Again the convai repository has done most of the heavy lifting for us. I made a convenience wrapper around it with make so we can simply run:
make interact CHECKPOINT_DIR={path-to-checkpoint} DATA={path-to-training-data}
This will open up an interactive terminal where you can chat with your newly created bot. Just make sure that your models and data are in the same directory or a subdirectory of the one where the Makefile is located. What I’ve learned is that my dad and I don’t really have meaningful conversations via text. It seems like we mostly share bits of information, small talk about our day, or schedule things. The model is super good at scheduling.
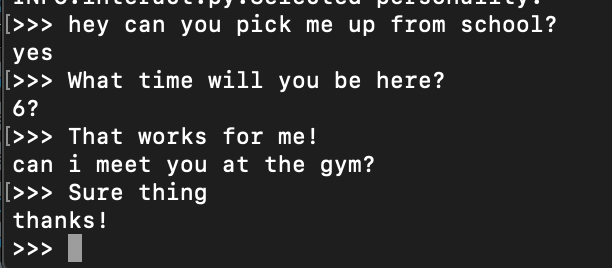
It’s not great at having a heartfelt conversation, but it does capture my dad’s writing texting style accurately. It still feels like briefly chatting with him if the conversations are short and in a domain that we would normally text about.
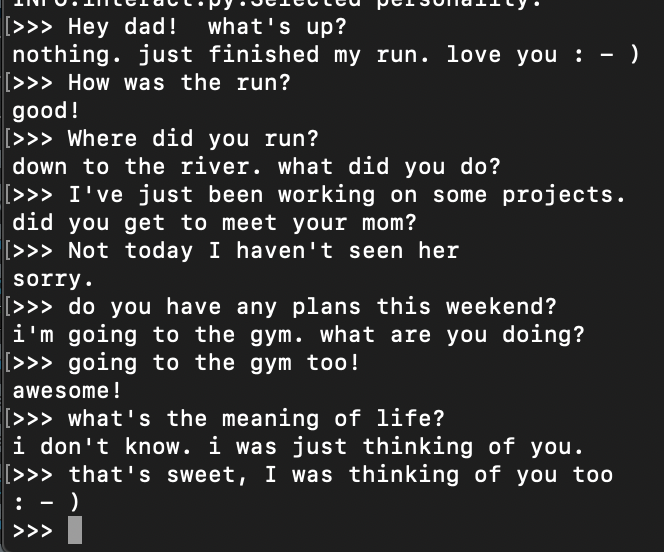
Then again sometimes it surprises me.

Next Steps
For short conversations inside our normal texting domain, this chatbot can feel a bit like my father. I’m going to spend the next year trying to have some deeper conversations over text and then redo this experiment next fall. I hope I can capture a little bit more information by having longer more intricate text-based conversations. As an alternate project, you could try to train a chatbot of yourself. With a you-bot, it might be fun to automate simple text conversations using something like Twilio.