Host your own Vector Data Base

Introduction
With the advent of high quality performant embeddings for various data types search has never been easier to implement on your own. One of the key technologies that makes this work is the vector database. Vector databases are databses which are optimized for performing similarity search over vectors. This is extremely useful for things like recommender systems, RAG, semantic search, etc. The list is quite long. In this tutorial we’ll setup a Postgres vector database and talk about how to use it.
There are many incredible managed vector database offerings, but sometimes you need this service in house. I wanted to put together a simple tutorial on how to setup a performant and secure vector database in AWS on your own. This post won’t go into detail about how vector databases work but will cover setting up an isolated Postgres database in AWS. We’ll talk about doing some simple embeddings and manage everything with CDK. At the end of this post you should understand how to:
-
Setup a secure Postgres RDS with AWS CDK
-
Connect to the database securely using SSM
-
Create a vector index in the data base and run search.
Appeal to Reader
If you pay for Medium, or haven’t used your free articles for this month, please consider reading this article there. I post all of my articles here for free so everyone can access them, but I also like beer and Medium is a good way to collect some beer money : ). So please consider buying me a beer by reading this article on Medium.
Why host your own?!
Okay I can already hear the critique, “why would you manage this yourself when there are so many great offerings?” For the most part, I agree! I love Pinecone and if I have a system where I just need a vector data base to do it’s job I almost always turn to them. Their serverless offering is insanely cheap and easy to setup. However, there is a solid argument for using Postgres. If you’re already using Postgres as part of your data infrastructure extending it to also be your vector solution can reduce the number of tools you need. It’s nice to have data scientists only work with one tool instead of two.
It can also be more performant. Hear me out, imagine that you’re application needs to do a join. You have some information you want to search over but that metadata doesn’t exist in your managed VectorDB. Well now you have round trip time. You need to make a request to your Vector DB, take that information make a request to your normal DB, and then return to the client. That’s a bunch of extra communication steps. At scale that can be a lot of unnecessary waiting. If everything can be done inside of one tool, you have less communication overhead. This needs to be balanced with other benefits and drawbacks but it can be a compelling argument for why you might want to do this.
Setup
For this tutorial we will be using AWS CDK. You’ll need to setup a few things to get CDK working. Take a look at AWS’ excellent introduciton here. If you follow that tutorial you should have everything you need to make this work. To set up your project after installing everything simply run:
cdk init vevtor-db --language python Architecture
Hosting a database in AWS is simple. The part of this tutorial that is finiky, and hopefully interesting, is doing it in a way that is secure. If you want to host production data you don’t want that data exposed to the internet so no egress or ingress. If no one can access your database it’s secure! Naturally a database you can’t access isn’t much good to you. We can solve this problem by using an isolated subnet in a VPC. We are going to completely isolate our database in a private subnet, the only thing which will be able to access it is a bastion host that is locked down. This can complicate access. AWS has a great tool SSM which can allow us to access instances in the cloud like we would over SSH but using IAM to do the authentication. It’s an incredibly useful tool for building secure systems that are a breeze to manage. You can say goodbye to constantly having to manage SSH keys!
The general architecture looks like this:
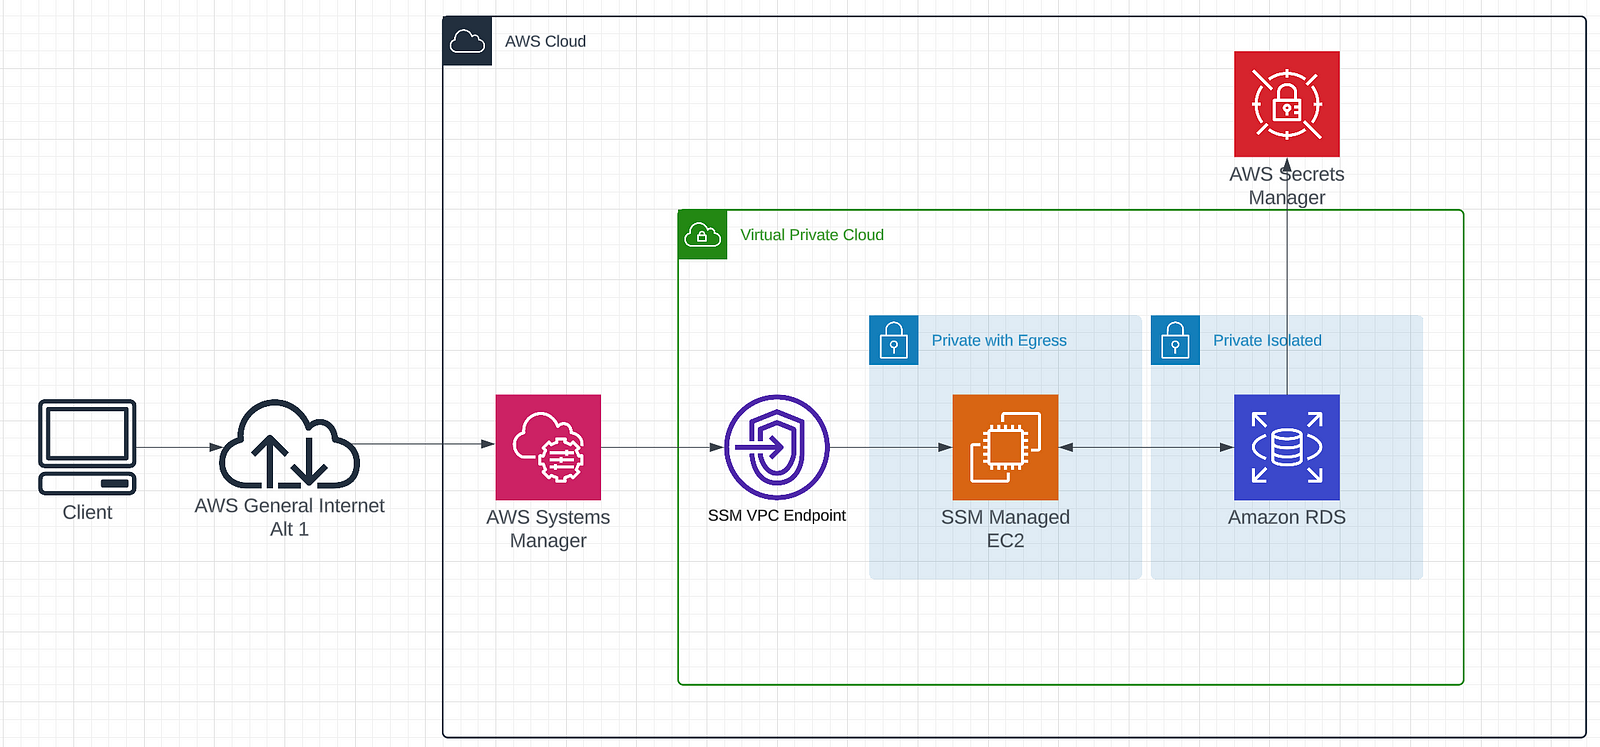
We are going to step through each part of this diagram building it out step by step in CDK. At the end you’ll have a secure RDS instance that you can deploy to AWS!
Let’s start by Creating the network. We want to completely isolate our RDS instance from the dangers of the web. We’ll create a private isolated subnet and a private subnet with egress for our bastion host.
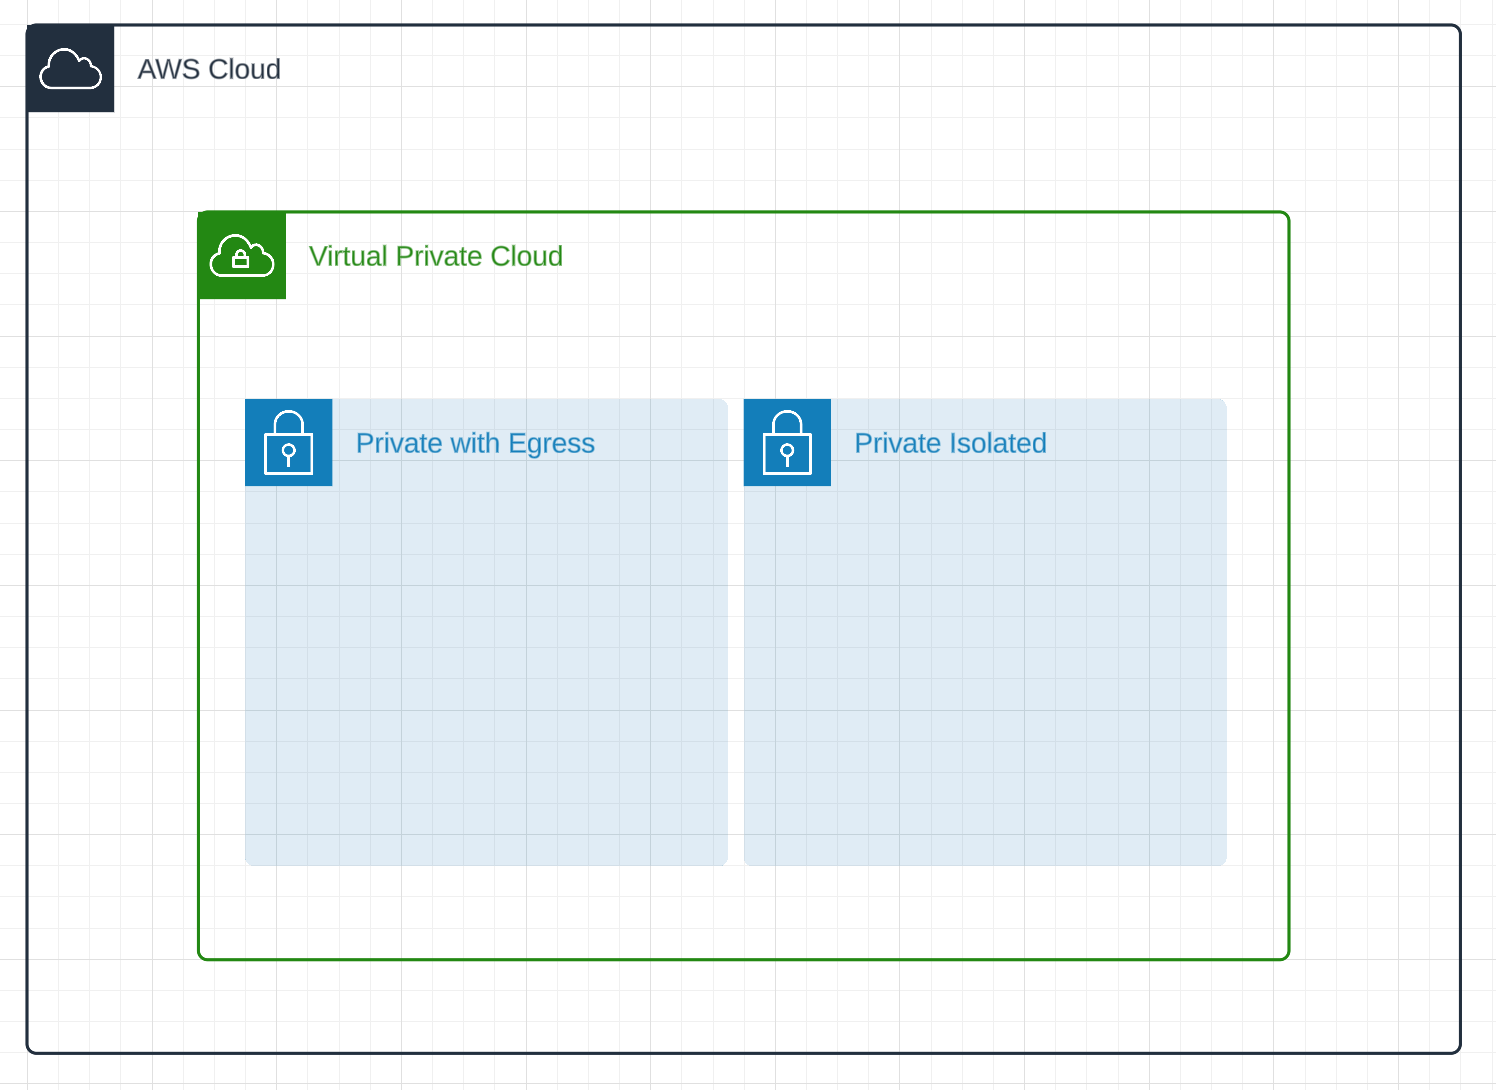
All of this can be accomplished in a CDK one liner!
vpc = ec2.Vpc( self, "PostgresVectorDBVPC", subnet_configuration=[ ec2.SubnetConfiguration(name="public", subnet_type=ec2.SubnetType.PUBLIC), ec2.SubnetConfiguration(name="private", subnet_type=ec2.SubnetType.PRIVATE_WITH_EGRESS), ec2.SubnetConfiguration(name="isolated", subnet_type=ec2.SubnetType.PRIVATE_ISOLATED), ], ) Now that we have our VPC configured we need to fill it in with our machines. Let’s start by configuring the bastion host. We will create a tiny EC2 instance which has access to the internet and is managed by SSM. This will allow us to proxy into our RDS instance without exposing it to the internet.
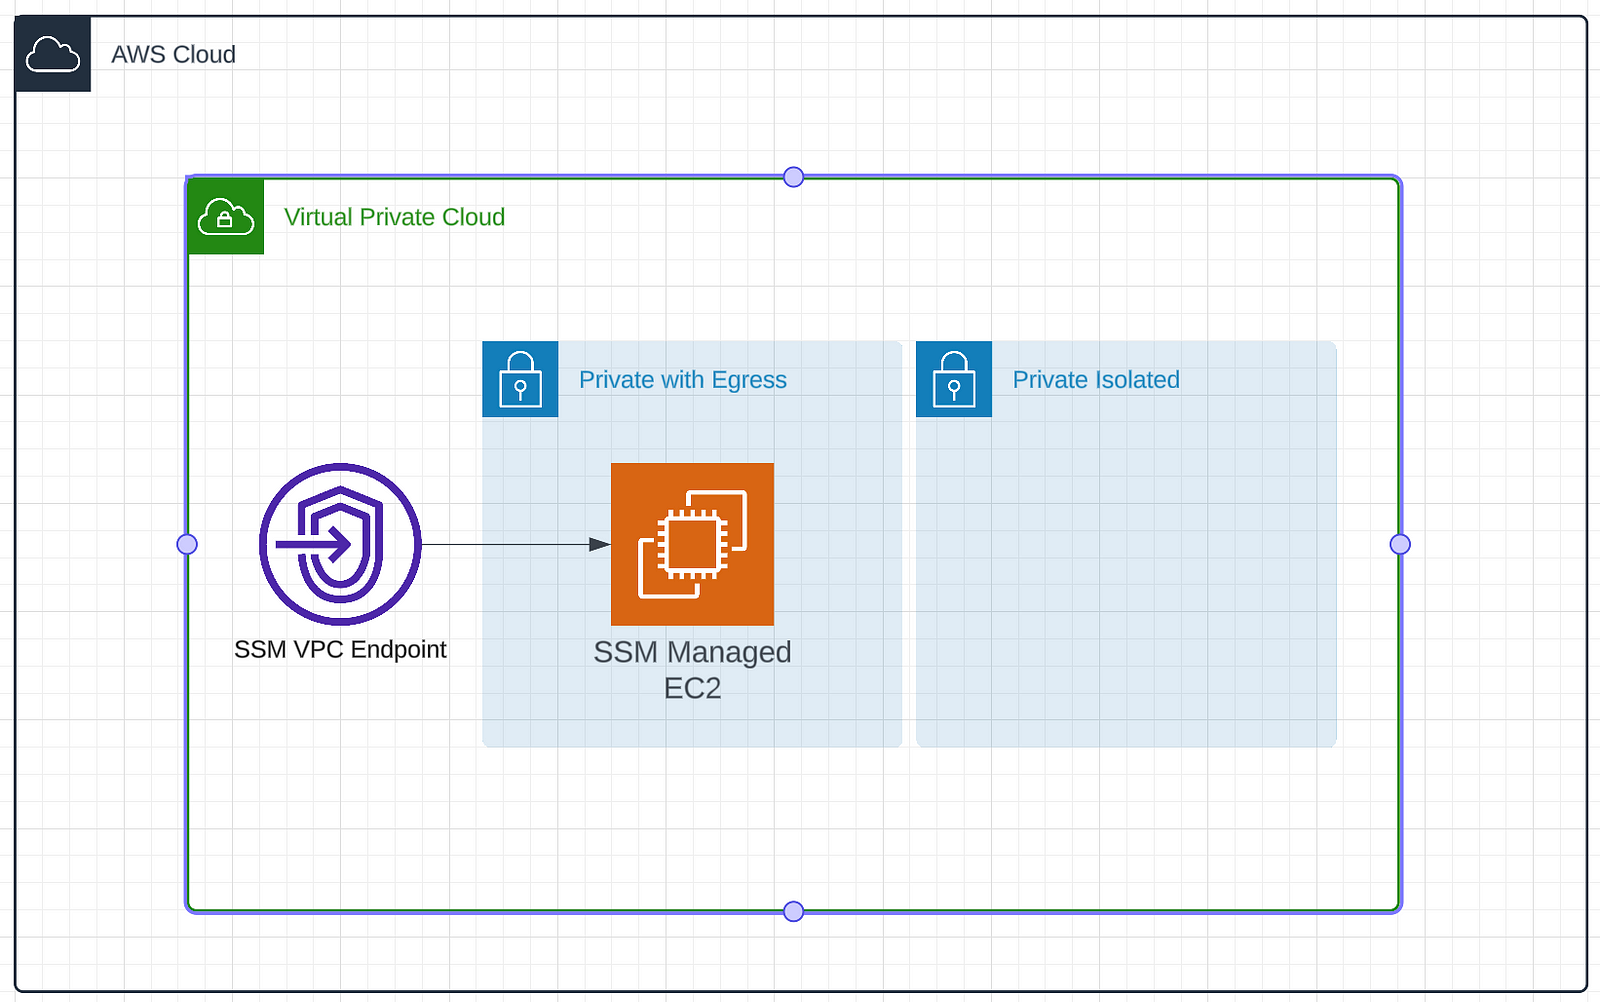
For this we’ll need to create an instance and some associated security groups. We’ll start by setting up the networking rules. We only want data traveling on port 5432. This is because we are going to open this port for Postgres when we setup the RDS. We also want to allow data on 443. This will allow SSM to communicate with the instance and receive data. This locks things down pretty tightly. There are only two ports open and they only allow data to exit. SSM will handle our connectivity and to allow this we need to create an IAM role with SSM permissions. Lastly we create the instance. We pick a small instance because all it will be doing is proxying data around. This can be done in relatively few lines of CDK.
# Create a security group to manage ports and traffic.

sg = ec2.SecurityGroup( self, "SecurityGroup", vpc=vpc, description="Allow SSH and PostgreSQL", security_group_name="CDK-SG-EC2-RDS", ) sg.add_egress_rule( peer=rds_sg, connection=ec2.Port.tcp(5432), description="Allow EC2 Bastion Host to send traffic to the RDS instance.", )

# Allow HTTPS traffic for SSM connections to the Bastion host.

sg.add_egress_rule(ec2.Peer.ipv4(vpc.vpc_cidr_block), ec2.Port.tcp(443), "Allow HTTPS to SSM VPC Endpoint")

# Create an IAM role for the EC2 instance

role = iam.Role( self, "InstanceSSMRole", assumed_by=iam.ServicePrincipal("ec2.amazonaws.com"), managed_policies=[iam.ManagedPolicy.from_aws_managed_policy_name("AmazonSSMManagedInstanceCore")], )

# Define the EC2 instance

instance = ec2.Instance( self, "Instance", instance_type=ec2.InstanceType("t3.micro"), machine_image=ec2.MachineImage.latest_amazon_linux2023(), vpc=vpc, role=role, security_group=sg, vpc_subnets=ec2.SubnetSelection(subnet_type=ec2.SubnetType.PRIVATE_WITH_EGRESS), )
Now that we have the ability to connect to our private network we should add the RDS instance. We’ll create the instance, some associated security groups to manage connectivity, and a database secret that we store in secrets manager. It will look like this.
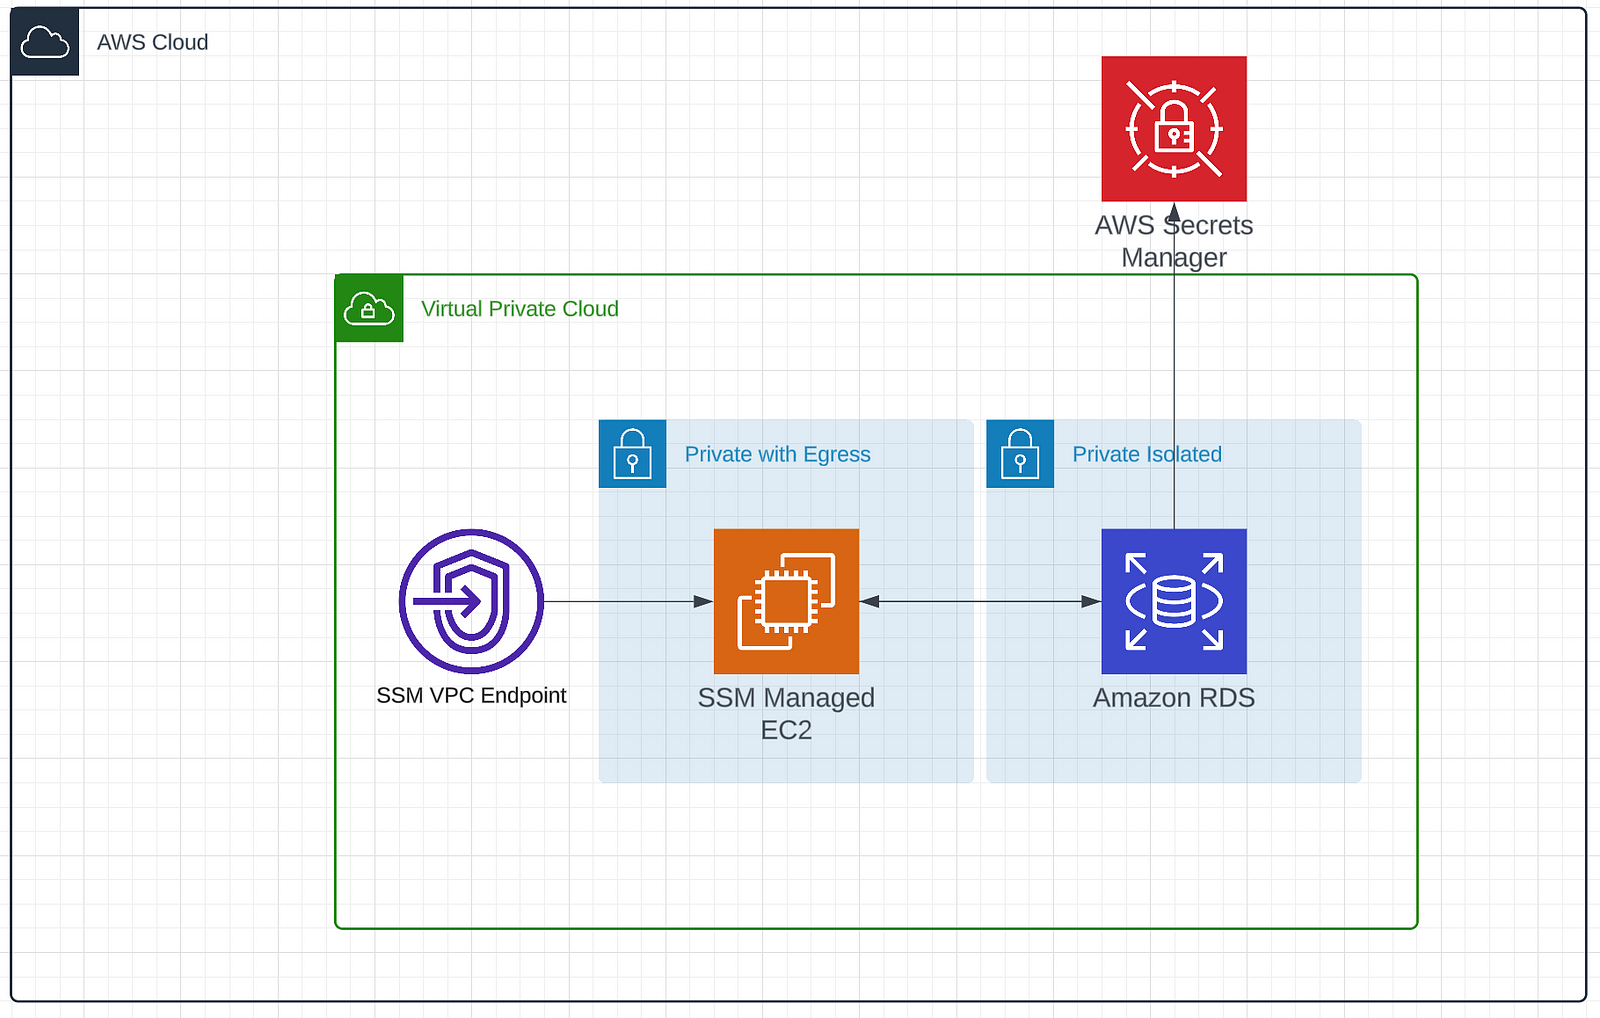
We start by creating our security group and allowing data to flow in over port 5432. Remember that this is still on an isolated subnet. So this isn’t available to the broader internet. This allows the bastion host to send data through at this port.
We then create a secret with a username and passwords and store it in secrets manager. Finally we instantiate our RDS instance with all of the goodies we’ve created so far.
 rds_sg = ec2.SecurityGroup( self, "RDSSecurityGroup", vpc=vpc, description="Security group for RDS instance", )

# Allow inbound PostgreSQL traffic from bastion host's security group

rds_sg.add_ingress_rule( peer=sg, connection=ec2.Port.tcp(5432), description="Allow PostgreSQL access from EC2 bastion host" )

# Create a database secret

db_secret = secretsmanager.Secret( self, "DBSecret", generate_secret_string=secretsmanager.SecretStringGenerator( secret_string_template='{"username":"postgres"}', generate_string_key="password", exclude_characters='@/" ', ), )

# RDS Instance with IAM Authentication

db_instance = rds.DatabaseInstance( self, "PostgresVectorDB", engine=rds.DatabaseInstanceEngine.postgres(version=rds.PostgresEngineVersion.VER_15_6), instance_type=ec2.InstanceType.of(ec2.InstanceClass.BURSTABLE3, ec2.InstanceSize.MICRO), vpc=vpc, security_groups=[rds_sg], vpc_subnets={"subnet_type": ec2.SubnetType.PRIVATE_ISOLATED}, iam_authentication=True, multi_az=False, allocated_storage=20, max_allocated_storage=100, credentials=rds.Credentials.from_secret(db_secret), )
Lastly, I like to add some outputs to the cloud formation template so that it’s easy to find variables and things I care about in the console. Here we add the instance id of our bastion host and the address of our RDS instance which we’ll need later.
export RDSHOST="ragtutorialstack-postgresvectordb82399e33-ivuky8itvcc5.cbas6w2cunpd.us-west-2.rds.amazonaws.com" export PGPASSWORD="$(aws rds generate-db-auth-token --hostname $RDSHOST --port 5432 --region us-west-2 --username db_user)" With these credentials in hand we can establish an SSM session with our EC2 instance that we created as our bastion host. The SSM agent running on the SSM managed instance processes the request from Systems Manager. That communication is possible via the SSM VPC endpoints configured for that purpose. The following command will setup the port forwarding. Make sure to set --target to the instance id that was generated by CDK.
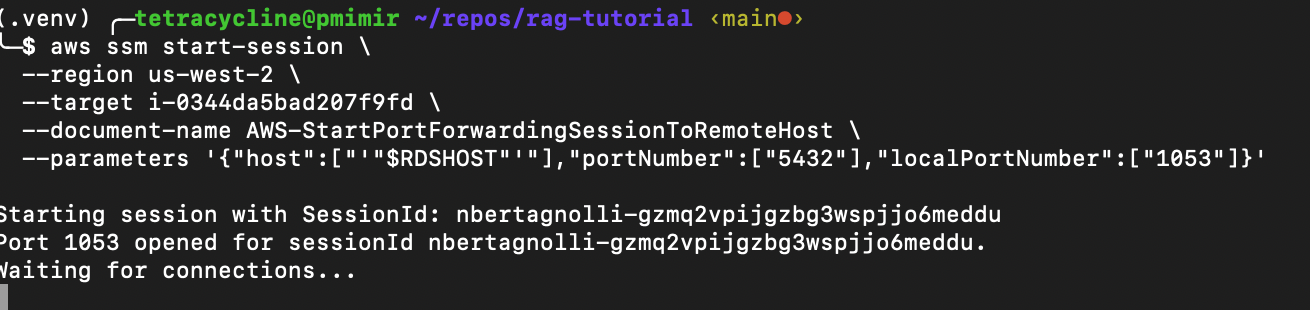
aws ssm start-session \ --region us-west-2 \ --target i-0344da5bad207f9fd \ --document-name AWS-StartPortForwardingSessionToRemoteHost \ --parameters '{"host":["'"$RDSHOST"'"],"portNumber":["5432"],"localPortNumber":["1053"]}' After running the command you should see Waiting for connections…
This means we’ve successfully connected to the bastion host. Now we can connect to the database by running:
psql --host localhost \ --port 1053 \ "dbname=postgres user=postgres" WAIT!!!!! This actually isn’t secure. SSM handles a lot of security for you but you need to encrypt your data in transit. We can use TLS for this. To do that download the SSL Certificate for your region. We’re using us-west-2 in this tutorial. With this certificate in hand we can update our psql query to encrypt our traffic.
psql --host $RDSHOST \ --port 1053 \ "sslmode=verify-full sslrootcert=/repos/rag-tutorial/us-west-2-bundle.pem dbname=postgres user=postgres" Unfortunately this will just hang. You’re trying to connect to the RDS HOST but your port forwarding is local. You need to edit etc/hosts to direct local to rdshost. Remember you need to reload the etc/hosts file before your terminal will start using it.
echo "127.0.0.1 $RDSHOST" >> /etc/hosts This will ask you for a password. Log into the AWS console and retrieve the password from secrets manager.
Voila! You’re connected to RDS in an isolated subnetwork of a VPC. You’re connecting over SSM with no externally open ports to a bastion host that is fully private. Pretty neat!

Now we can start doing fun stuff with our very own self hosted vector database!
Vector DB
Vector databases are so hot right now. We can turn this RDS instance into a vector database in only a few lines of code! Let’s add GloVe embeddings to a table so that we can query for similar words. GloVe embeddings are pretty old school but we can download the glove.6B.zip file which contains some 50 dimensional embeddings for a 400k words. It’s a big enough dataset to play with without taking a ton of time to setup. Download those files and then open them in Pandas.
 import pandas as pd import numpy as np import psycopg2 from psycopg2.extras import execute_values from pgvector.psycopg2 import register_vector

# Load the GloVe file into a DataFrame

df = pd.read_csv("data/glove.6B/glove.6B.50d.txt", sep=" ", header=None, quoting=3, engine='python')

# Split the DataFrame into words and their embeddings

words = df.iloc[:, 0] embeddings = df.iloc[:, 1:].apply(lambda x: x.tolist(), axis=1)

# Create a new DataFrame with two columns

glove_df = pd.DataFrame({'text': words, 'embeddings': embeddings})
Let’s take a look at our data. We see that there are 400k records a column called text that contains the word and then a column called embeddings that holds a 50 dimensional vector as a list.
Next we need to connect to our instance using Python. You’ll need to update the host name, password, and path to your sslrootcert.
 def create_connection(): """Create a database connection using psycopg2 with SSL using environment variables.""" connection = None try: connection = psycopg2.connect( host="ragtutorialstack-postgresvectordb82399e33-ivuky8itvcc5.cbas6w2cunpd.us-west-2.rds.amazonaws.com", port=1053, dbname="postgres", user="postgres", # use the dbuser with iam auth! password=..., sslmode="verify-full", # Ensure SSL usage and server certificate verification sslrootcert="/repos/rag-tutorial/us-west-2-bundle.pem" ) print("Secure connection to PostgreSQL DB successful") except OperationalError as e: print(f"The error '{e}' occurred") return connection

conn = create_secure_connection()
With the connection in place we can install the vector extension to Postgres.
cur = conn.cursor() cur.execute("CREATE EXTENSION IF NOT EXISTS vector"); conn.commit() Create the table to store our word embeddings. The Pandas DataFrame had two columns word and embedding so we replicate that here. We set the vector dimensions to 50 and commit this to the database.
 table_create_command = """ CREATE TABLE word_embeddings ( id bigserial primary key, word text, embedding vector(50) ); """

cur.execute(table_create_command) cur.close() conn.commit()
Register the connection as a vector connection. This tells postgres this connection will be working with vector data.
register_vector(conn) Now we can add our embeddings. This will take several minutes.
```
# Batch insert embeddings and metadata from dataframe into PostgreSQL database
register_vector(conn)
cur = conn.cursor()
# Prepare the list of tuples to insert
data_list = [(row['text'], np.array(row['embeddings'])) for index, row in glove_df.iterrows()]
# Use execute_values to perform batch insertion
execute_values(cur, "INSERT INTO word_embeddings (word, embedding) VALUES %s", data_list)
# Commit after we insert all embeddings
conn.commit()
```
Then query them!
 def get_similar(query_embedding, conn, n: int=3): embedding_array = np.array(query_embedding)

```
# Register pgvector extension
register_vector(conn)
cur = conn.cursor()
# Get the most similar words using the KNN <=> operator
cur.execute(f"SELECT word FROM word_embeddings ORDER BY embedding <=> %s LIMIT {n}", (embedding_array,))
return cur.fetchall()
```

get_similar(glove_df[glove_df["text"] == "pumpkin"]["embeddings"].tolist()[0], conn)
This returns some reasonable results, a potato seems reasonably close to a pumpkin.
[('pumpkin',), ('potato',), ('watermelon',)]
Speed
These results seem great on the surface but how’s the performance? Benchmarking and performance analysis is pretty hard to get fully right. We’re going to do some estimates just to get a sense of how fast this services is compared to a managed service like Pinecone but by no means is this definitive. Pinecone has an incredible free tier so I’d highly recommend them for any personal projects or just playing around with vector databases. If you create an account and an index called glove, you can add all of this data to a Pinecone serverless instance with the following code:
 from pinecone import Pinecone from tqdm import tqdm

pc = Pinecone(api_key=...) index = pc.Index("glove")

data_list = [{"id": str(index), "values": list(row['embeddings']), "metadata": {"text": row['text']}} for index, row in glove_df[~glove_df["text"].isna()].iterrows()] def chunks(lst, n): """Yield successive n-sized chunks from lst.""" for i in range(0, len(lst), n): yield lst[i:i + n]

for chunk in tqdm(list(chunks(data_list, 120))): index.upsert(vectors=chunk)
Let’s timeit!
%%timeit results = index.query( vector=glove_df[glove_df["text"] == "pumpkin"]["embeddings"].tolist()[0], top_k=3, include_values=True, include_metadata=True ) This gives us:
185 ms ± 25.8 ms per loop (mean ± std. dev. of 7 runs)
Doing the same for Postgres yields:
371 ms ± 77.4 ms per loop (mean ± std. dev. of 7 runs).
So on the surface from this one test Pinecone serverless seems almost twice as fast but both are sub-second latency. There is a quick trick up our sleave. We can create an index over the data using cosine distance. This effectively breaks up the data into regions and only looks over subregions for words. Take a look at Pinecone’s blog or timescale’s blog for excellent descriptions of how these partitionings work.
%%timeit import math cur = conn.cursor() cur.execute(f'CREATE INDEX ON word_embeddings USING ivfflat (embedding vector_cosine_ops) WITH (lists = {int(math.sqrt(glove_df.shape[0])});') conn.commit() With this new index if we rerun the Postgres timing analysis we get:
224 ms ± 38.4 ms!
The error bars on those two measurements overlap. For this n of one study those look to be about the same amount of time!
Conclusion
We used CDK to deploy a secure Postgres RDS instance in the cloud. We learned how to conenct to it using SSM instead of SSH and then setup a vector database. We played around with timing and saw that by doing some indexing we can get roughly comparable performance to a hosted solution. Good luck with all of your vector database projects! Happy building : )